📋 Application Course Phase
🎥 Video Tutorial: Watch here
The Application Phase enables instructors to create application forms for students and manage their submissions. Students can apply to a course by answering a customizable set of questions defined by the instructor.
⚙️ Setting Up the Application Phase
1. Add an Application Phase
Use the Course Configurator to add an Application Phase to your course structure.
2. Navigate the Application Phase
Select the application phase in the course sidebar. Its administration area is split across the following pages, reachable from the sidebar:
| Page | Purpose |
|---|---|
| Application | Overview landing page with the phase status and demographic diagrams of the applicants. |
| Participants | List of applicants and their submissions. |
| Questions | Create and order the questions students answer. |
| Mailing | Configure the confirmation and status mails sent to applicants. |
| Settings | Define the application period and the general behavior of the phase. |
3. Configure the Application Settings
Open the Settings page. Configuration lives directly on this page (there is no separate configuration dialog).
Under General Settings you must define a start and end date. These timestamps use the system time (Europe/Berlin). If students access the application from other time zones, a note will be shown to clarify that deadlines refer to the German time zone.
You can also configure the following options:
| Option | Description |
|---|---|
| Enforce Student Login | Requires students with a university login and matriculation number to log in via Keycloak. Recommended in most cases. Disable only for self-hosted, non-university setups. |
| Allow External Students | Allows students without university credentials (e.g., exchange students) to submit applications. |
| Auto Accept | Automatically accepts every application. Use this only when the application serves as a simple registration form. |
| Intake Mode | Switches between the public application form and importing students from a CSV. See the Importing Students from a CSV section below. |
📥 Importing Students from a CSV
Instead of having students apply themselves, you can import a list of students from a CSV file. This is useful when the participants are already decided elsewhere (for example a central matching process or a spreadsheet).
Import is an either/or choice per application phase: when the intake mode is set to CSV Import, the public application form is closed and students can no longer apply on their own. Everything else about the phase (questions, participants, mailing) keeps working as usual.
Enabling Import Mode
Open the Settings page, set Intake Mode to CSV Import under General Settings, and save. The Participants page then shows an Import Students button. The manual Add Student dialog stays available too, so you can still add a single student who has no university login (for example an exchange student the CSV import cannot represent).
Switching modes never deletes existing applicants — it only opens or closes the public form.
Preparing the CSV File
Download the ready-made template from the import dialog (Download Template), or prepare your own file. The first row must contain the column headers.
Required columns (used to identify and match students):
| Column | Description |
|---|---|
| First Name | The student's first name. |
| Last Name | The student's last name. |
| University ID | The university login (e.g. the TUM ID ab12cde). Students log in with this identifier, so it must be correct for imported students to reach the course later. |
| The student's email address. |
Optional columns (matched automatically when named correctly): Matriculation Number, Gender, Nationality, Study Program, Study Degree, Current Semester.
Column names are matched case-insensitively and tolerate common variants (e.g. Matrikelnummer, Study Degree, Semester). Any column the importer cannot map to a known field can be imported as an application question (see below).
Running the Import
Click Import Students on the Participants page and follow the wizard:
- Upload — Select your CSV file. A preview of the parsed rows is shown.
- Map Columns — Each column is auto-assigned to a student attribute, to Import as Question, or to Ignore. Adjust any mapping you like; the four required fields must each be mapped to exactly one column.
- Review — See how many students are new versus existing (matched by University ID) and how many new questions will be created, then choose the status the imported students should receive:
- Accepted (passed) — the students count as accepted immediately and move on to the next phase.
- Not assessed — the students are registered but still reviewed like normal applicants.
- Result — A summary reports how many students were created and updated.
The chosen status is applied only to students the import newly adds. Students who are already in the phase keep whatever status they currently have, so re-importing a roster never overrides a decision (such as a rejection) you made by hand.
Re-running an import with the same University IDs updates those students instead of creating duplicates, so you can safely re-import an updated file.
:::note Clearing an imported value Re-importing overwrites a student's answer only when the cell has a value. Leaving a cell blank on re-import keeps the previously imported value rather than clearing it; edit or remove the value on the Questions or participant view instead. :::
Extra Columns as Questions
Any column mapped to Import as Question becomes a text application question on the phase, and each student's value in that column becomes their answer. This lets you carry additional CSV data (for example a preferred team or a note) into PROMPT alongside the students. Afterward these behave like any other question: they appear on the Questions page and their answers can be made available to later phases via Export Settings.
Logging In After an Import
Imported students may never have used PROMPT before. Because the import already creates their course participation, they automatically gain access to the course the first time they log in with their university account — no separate invitation step is required.
🧩 Creating Application Questions
Open the Questions page to build the application form. Click Add Question and choose one of the following types:
- Text Question
- Multi-Select Question
- Checkbox Question
You can reorder questions via drag-and-drop, and remove unsaved changes at any time before saving.
To preview the application as it will appear to students, use the Student Preview feature at the top of the page.
📝 Question Types
Below are details and configuration options for each available question type:
✏️ Text Question
Use this for open-ended answers such as motivation, experience, or personal information.
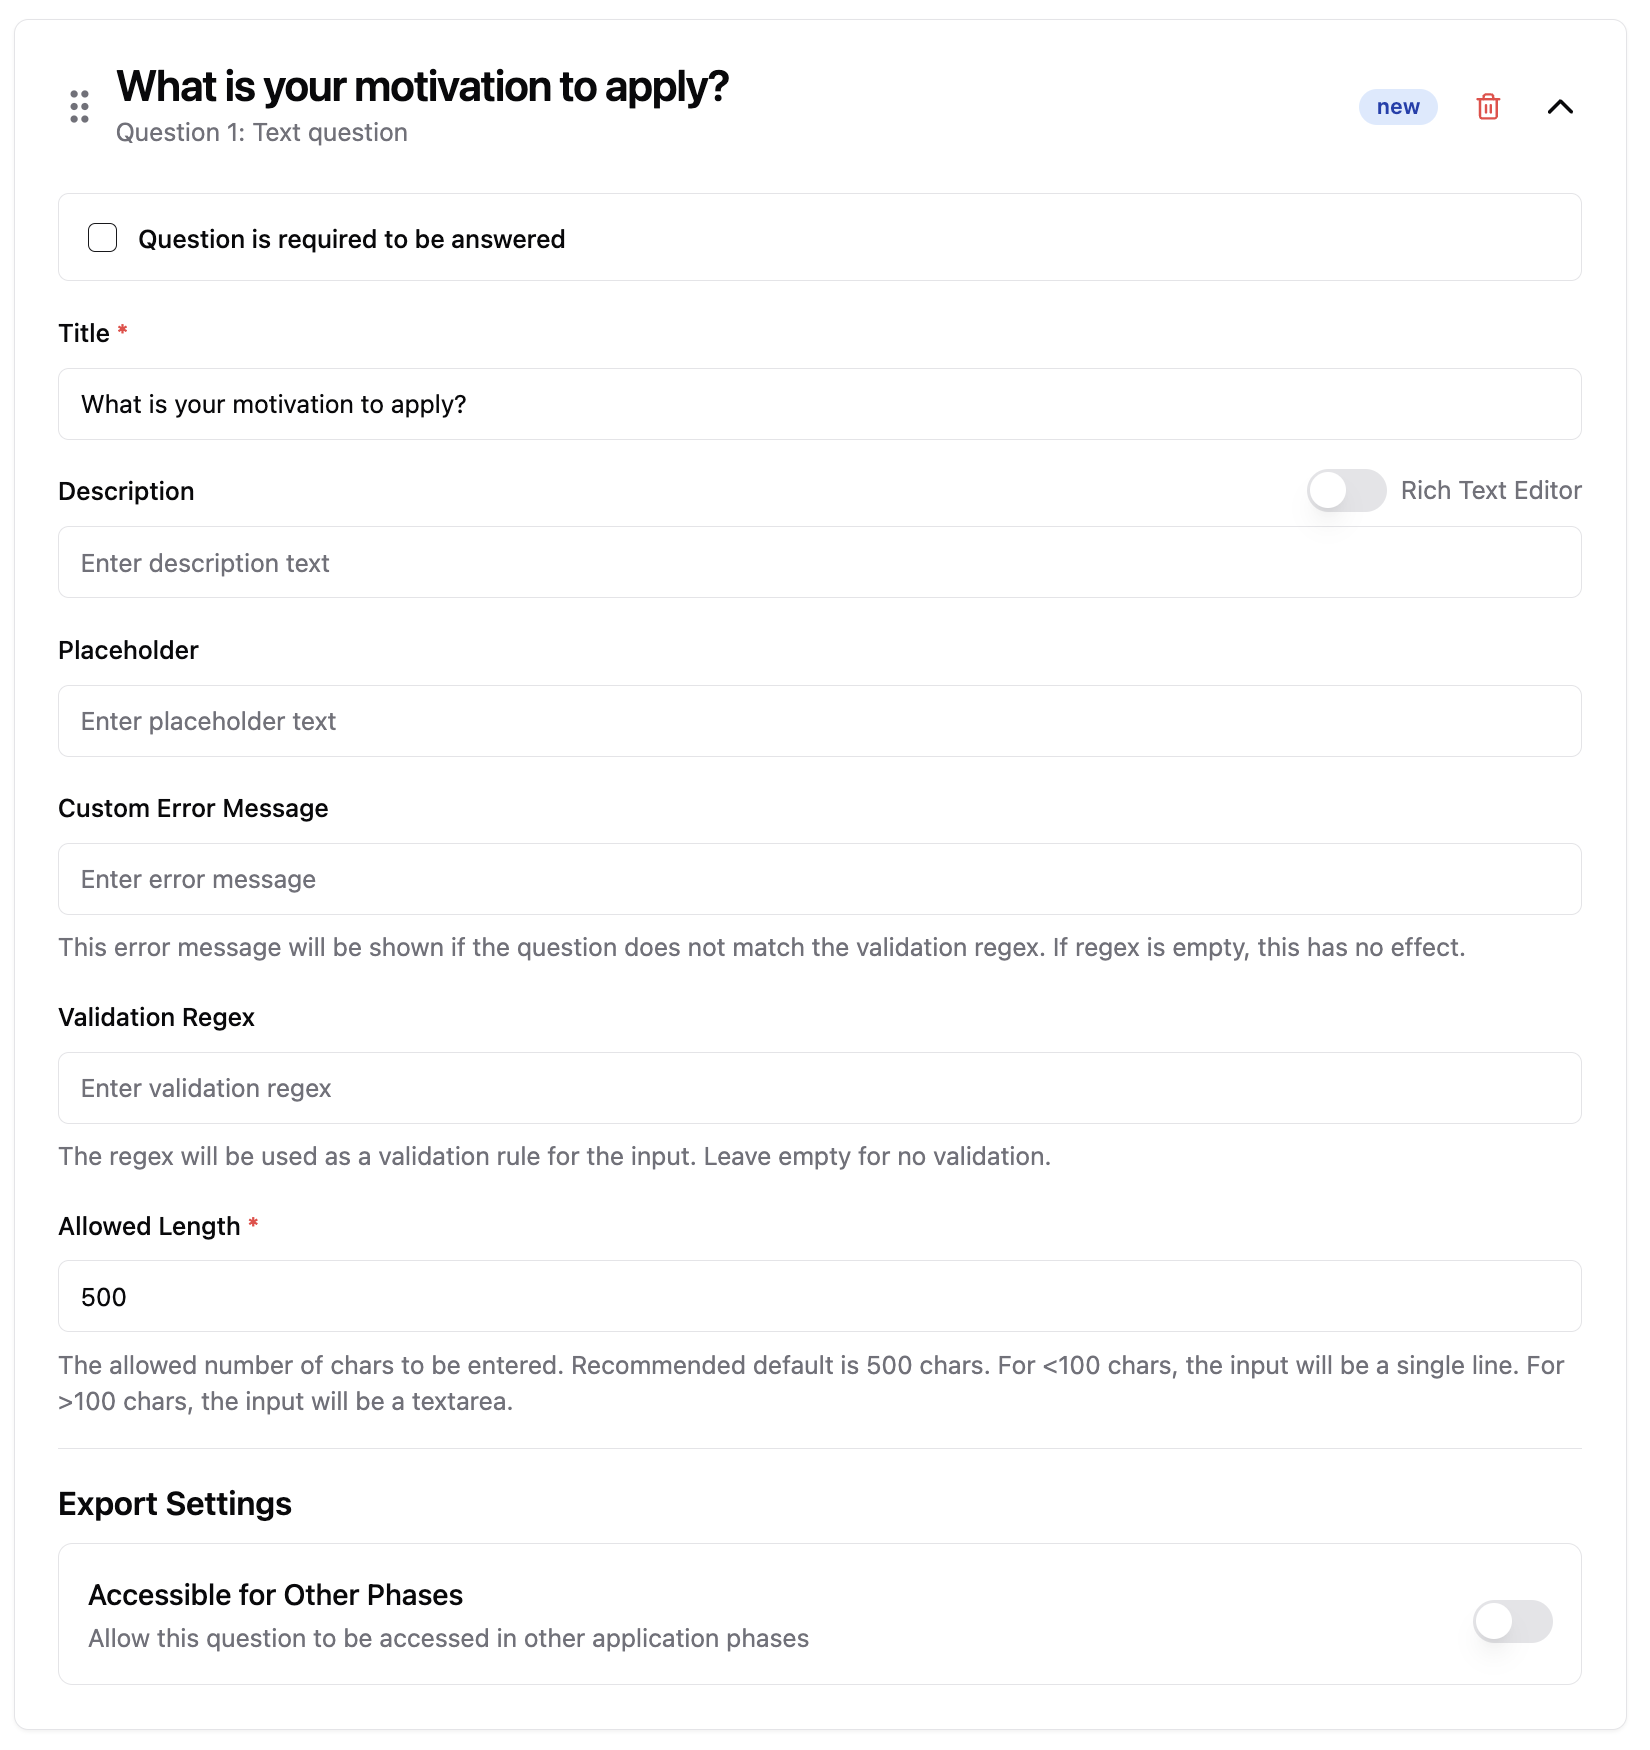
Fields:
-
Required Checkbox: Mark if the question must be answered.
-
Title (required): The question prompt.
-
Description: Optional additional instructions.
-
Placeholder: Sample text inside the input field.
-
Custom Error Message: Message shown if input fails regex validation.
-
Validation Regex: A regular expression for validating the response. I.e. to restrict the input to a number format or an UUID.
-
Allowed Length (required): Max character count.
If ≤100 characters → single-line input If >100 characters → textarea
-
Export Settings → Accessible for Other Phases: Toggle to make answers available in future phases. Enter a key, with which the answer will be accessible in the following course phases (if configured in the course configurator)
✅ Multi-Select Question
Use this to allow students to choose one or more options from a predefined list.
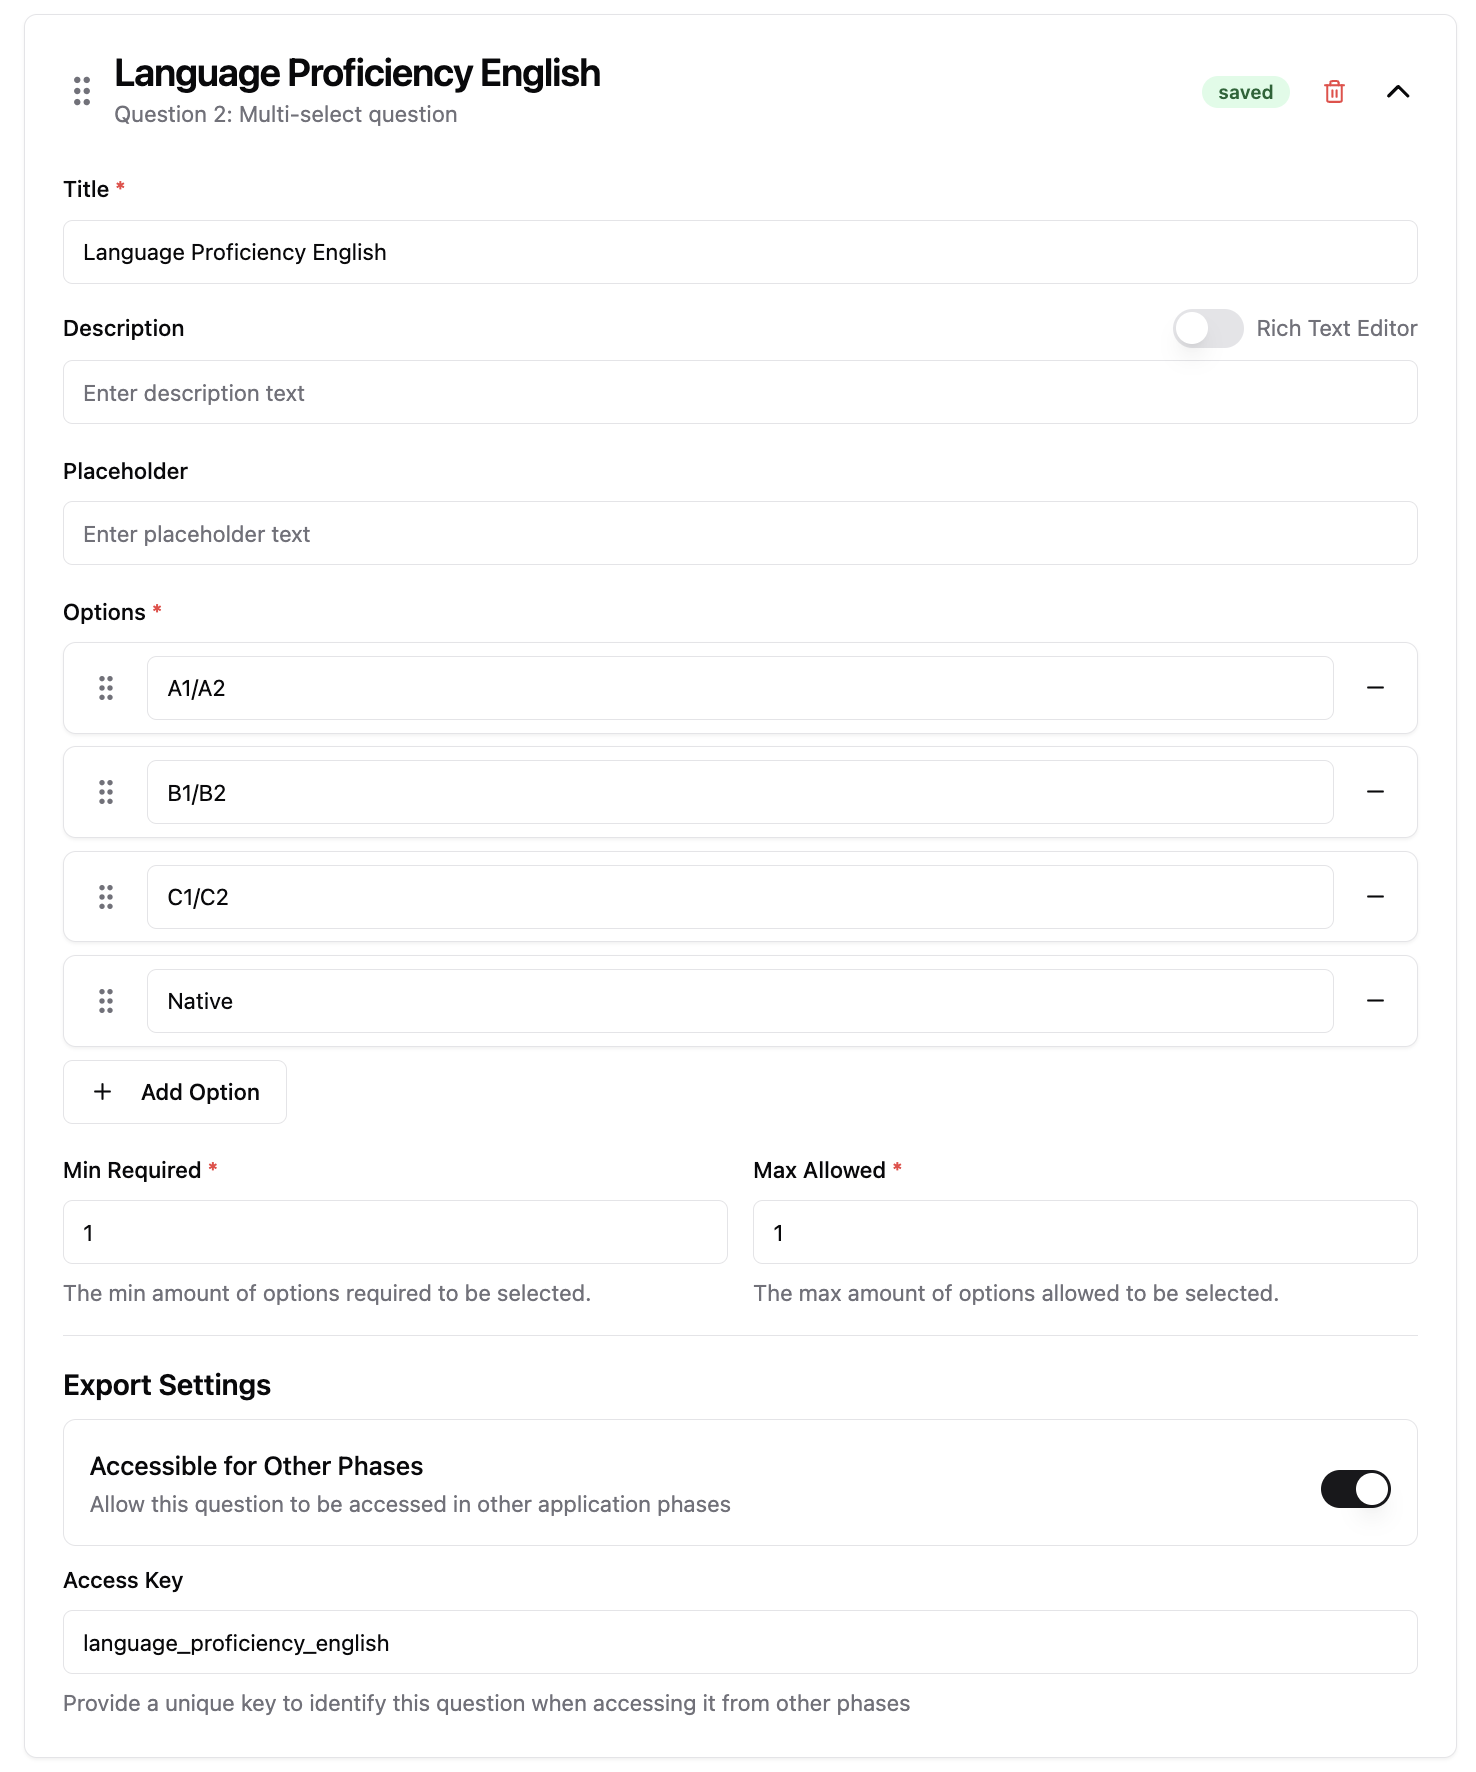
Fields:
- Title (required): The question prompt.
- Description: Optional additional info.
- Placeholder: Text displayed when no option is selected.
- Options (required): Add as many options as needed.
- Min Required / Max Allowed (required): Define how many options a student must select (e.g., select at least 1, at most 3). If min and max are both set to 1, then it will be displayed as a Single Select to the student.
- Export Settings → Accessible for Other Phases: Enable to share responses across later phases.
☑️ Checkbox Question
Use this for confirmations, declarations, or consent (e.g., "I agree to the terms").
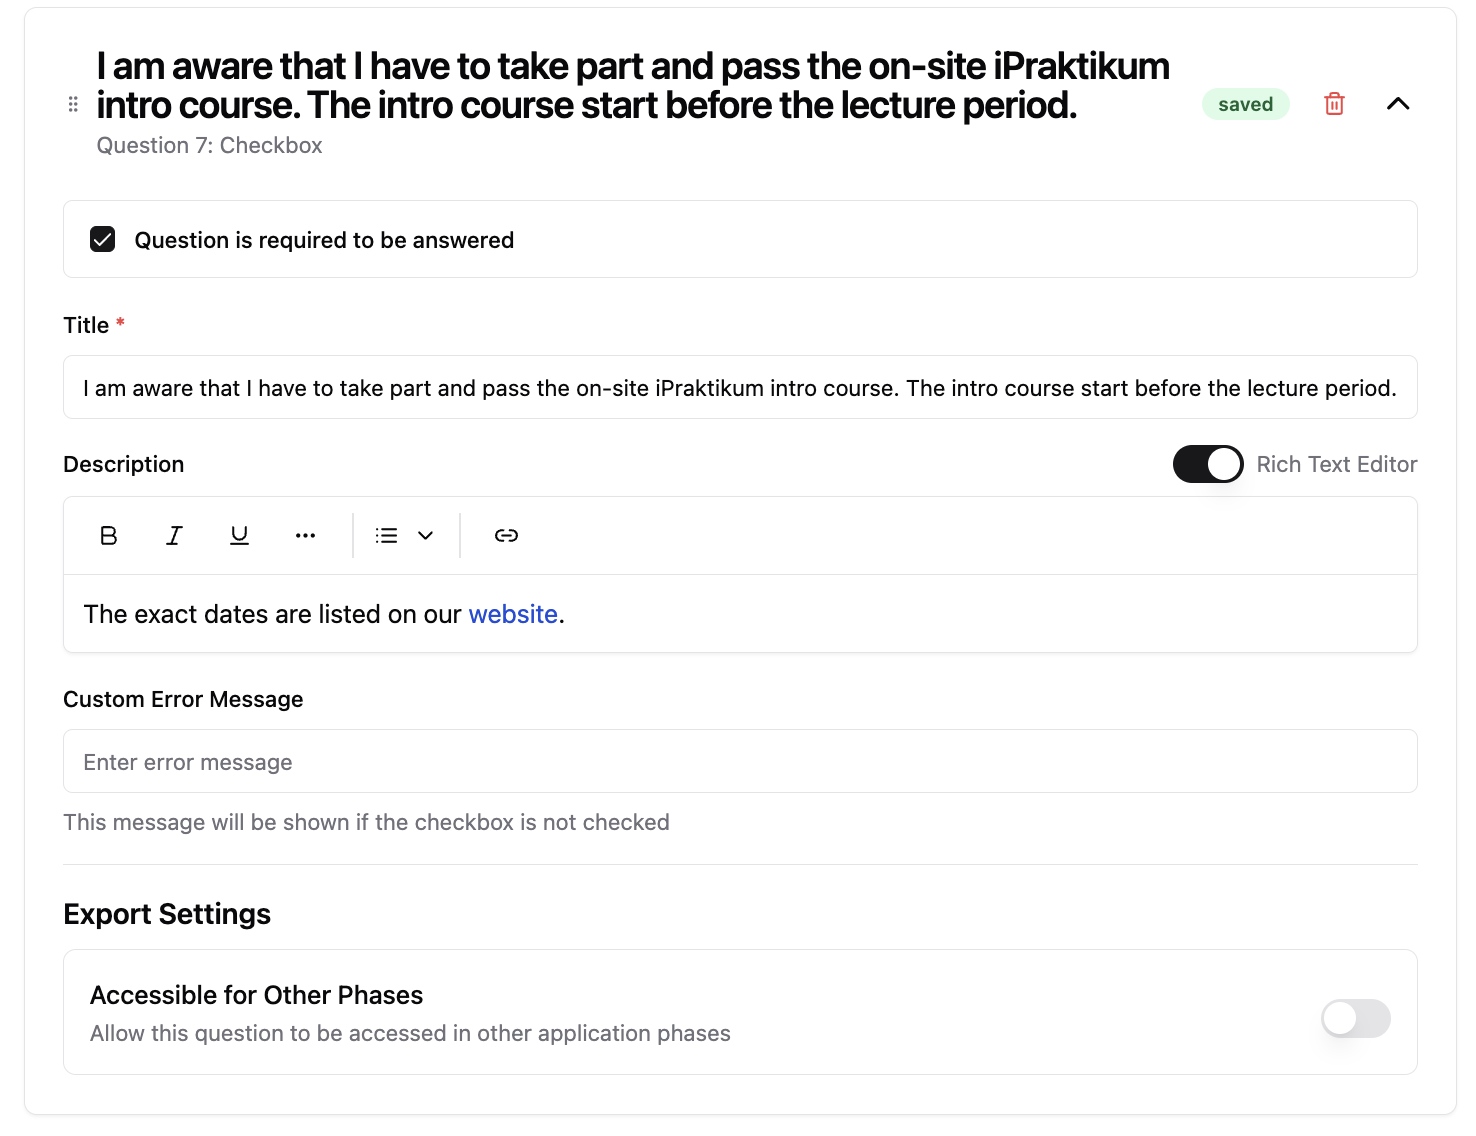
Fields:
- Required Checkbox: Specify whether this must be checked to proceed.
- Title (required): The statement the student must confirm.
- Description: Optional explanatory text.
- Custom Error Message: Shown if the box must be checked but is left empty.
- Export Settings → Accessible for Other Phases: Enable if later phases should access the response.